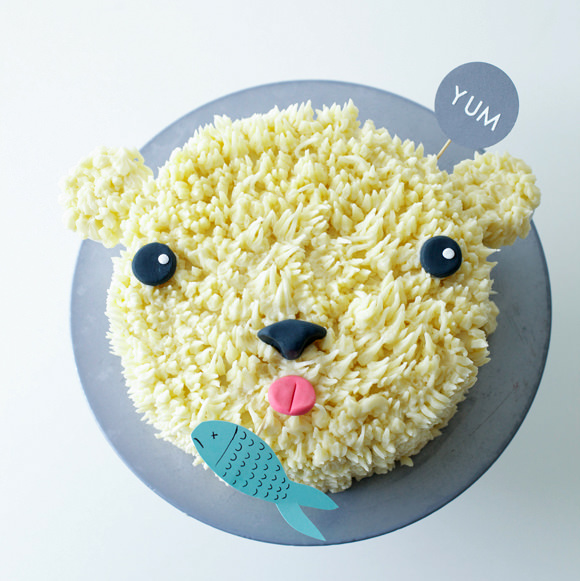
Snowy winter times call for a cozy, fuzzy polar bear cake! Perfect for holiday parties or an ultra cool Arctic-themed kid’s birthday. A polar bear cake and sashimi appetizers—that sounds like my idea of a dream party! This bear cake is easy to create and will delight both animal fans and lovers of cute design, not to mention your kids. Kids can help make this, too! They’ll love piping the polar bear’s fur and making a hilarious fish cake topper out of paper.

What You’ll Need
- A baked and cooled 2-layer cake of your choice (I used an 8-inch chocolate cake)
- Offset metal spatula or butter knife
- Piping bag fitted with a large multi-opening tip (I used a Wilton #233)
- Wooden BBQ skewers
- Blue paper, pen, and scissors for fish cake flag (optional)
- Gray paper and white letter stickers for YUM flag (optional)
Ingredients
- 4 cups of vanilla buttercream or two cans of frosting
- 4-inch ball of white fondant
- 2-inch ball of black fondant
- ½-inch ball of pink fondant
- A small amount of cornstarch for working with fondant

Step 1
Begin by filling your cake and frosting the entire exterior with buttercream using your offset spatula.
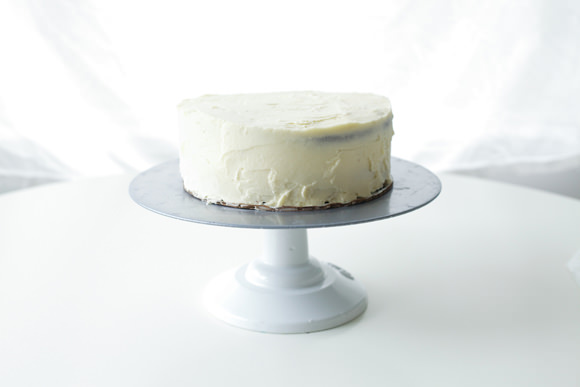
Your cake will be fully frosted. Don’t worry too much about it being perfectly smooth as you will be making it all “hairy” next!

Step 2
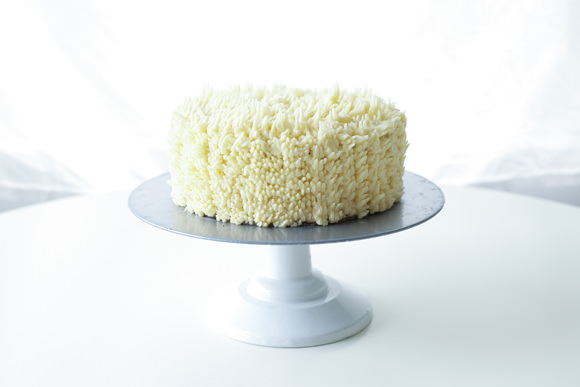
Using your piping bag fitted with the multi-opening tip filled with vanilla buttercream, pipe the sides of your cake. I start from the bottom and work my way up.
Step 3
Continue piping the top of your cake so the entire cake is covered in buttercream “fur.” Set aside.

Step 4
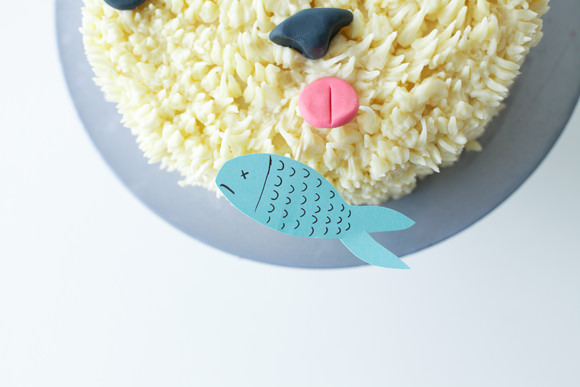
Create your fondant pieces to make the eyes, nose, tongue, and ears. To make the ears, roll two balls of white fondant and squash them down into thick circular patties. Cut a wooden BBQ stick evenly in two and insert into patties to make ears. Using the black fondant, shape the eyes and nose. Using the pink fondant, roll a small ball, squash it down into a patty and gently pull it into an oblong tongue-like shape. Use a knife to create a divot in the tongue.

Step 5
Place the white ears into the sides of the cake. Place the eyes, nose, and tongue onto the cake!

Step 6
Using the piping bag, pipe fur on top of and around the white fondant ears.
Step 7
Cut out a fish shape in blue paper and draw a few fish details—eyes, mouth, and tiny scales using a “U” shape. Attach the fish upside down onto a wooden skewer and place close to polar bear’s mouth! Add a “YUM” sign or “Happy Birthday” sign and you’re all set to polar bear party!
Hope you enjoyed this hairy bear-y cake DIY, everyone! See you again soon with more cute cake ideas to make your next birthday party the coolest yet!