We are SO excited for spring! Warmer weather, bright colors, spring flowers – we love it all. Once the weather warms up enough, we even set up tables outside and get the kids crafting in the open air. The sunshine and breeze sure are a welcome addition to a crafty afternoon and really get the creative juices flowing! Tie dying is so fun and easy – not only is it perfect for outdoor crafting, but it gets your kids experimenting with colors and shapes.
We’re thrilled to be partnering with NESTLÉ® PURE LIFE® 8oz “Share-a-Smile™” Kid Designed Edition for this post! NESTLÉ® PURE LIFE® believes that drinking water should be easy and fun. The new Nestlé Pure Life Kid Designed Edition bottles encourage kids to stay hydrated while they let their creativity soar.
Kids have lots of choices when it comes to beverages and research suggests that water is not always the first choice. Did you know that kids who drink 4+ glasses of water per day are more likely to frequently exhibit healthy habits, such as getting their own water when thirsty and eating fruits and vegetables at meal times without reminders? It’s true! Not only that, but replacing a single 12-ounce, 140 calorie sugar-sweetened beverage with water each day for a year can cut more than 65 cups of sugar from one’s diet.
Time to get crafting – let’s make these awesome tie dye tapestries!
What You Need
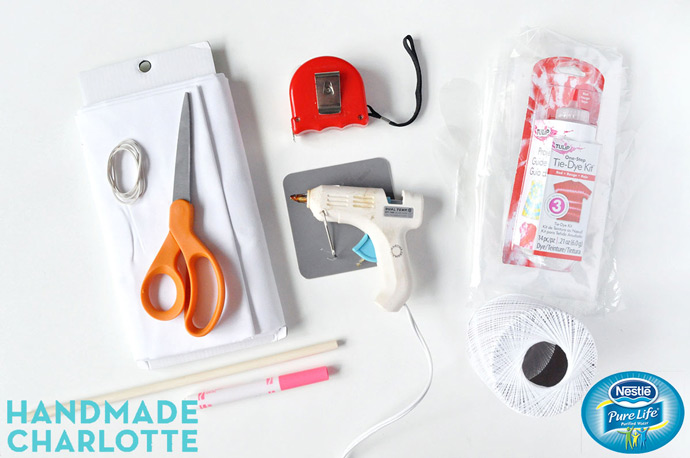
- White cotton
- Elastic bands
- Scissors
- Wooden dowel
- Washable markers
- Hot glue gun
- Tape measure
- String
- Tie dye kit
- Gloves
- Plastic table cloth
- Saran wrap/plastic bags
- Wire cooling rack (optional)
- Paper towel
How-To
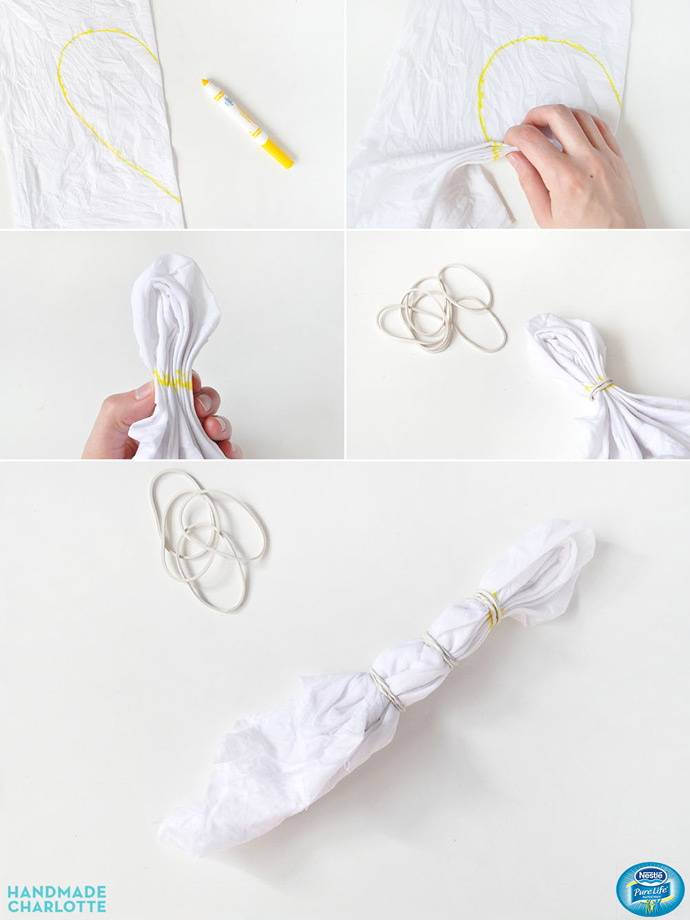
- Wash your white cotton to remove any sizing. You can also soak the cotton in a soda ash solution (it may come with your tie dye kit, or sold separately) to enhance the brightness of the colors but you can skip this step if you like. Cut the cotton into squares the size you’d like your wall hangings to be and you’re ready to start tying! First we’ll make a heart: fold the damp cotton in half and draw half a heart on the fold with the washable marker.
- Accordion fold the cotton so that the line you just drew is a straight line along the folds. Try to keep the folds as even as possible.
- When it’s all folded together, it should look like this.
- Use an elastic band to bind the folds together – wrap as many times as possible for a tight hold right along the marker line.
- Add more elastic bands onto the cotton to add details to the design.
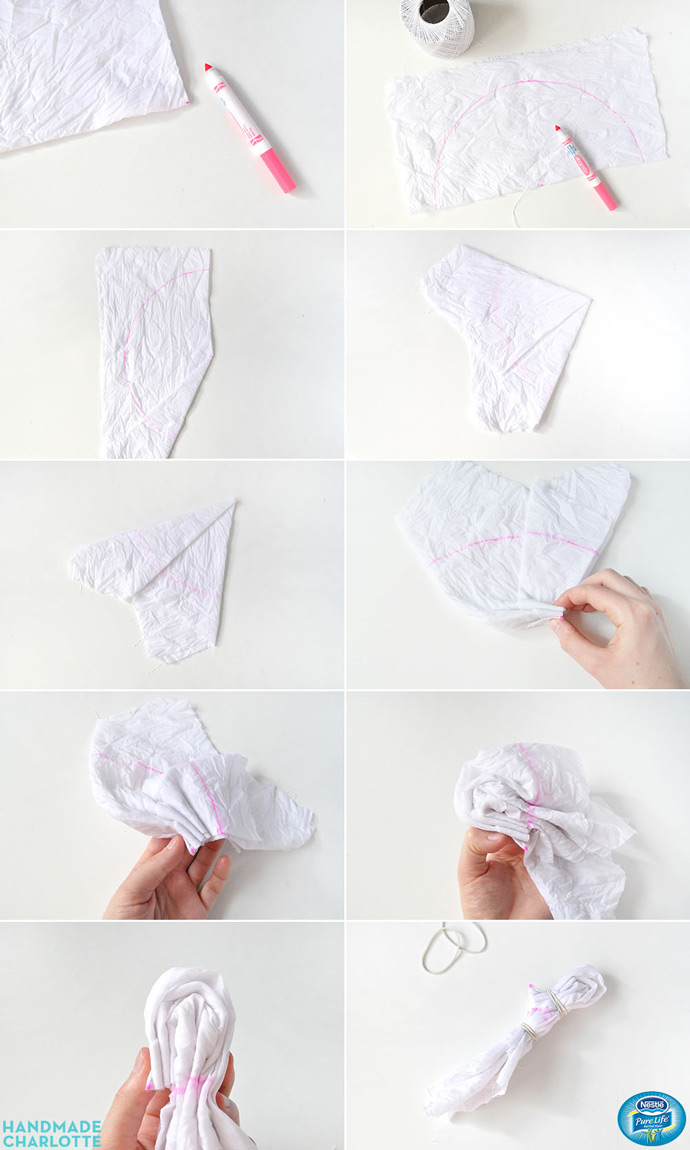
- Time to make the peace sign! This one is a bit tricker, so younger kids may need a bit of help to prep this one. This tutorial is also super helpful if you want to see this in video form. Start by folding your damp cotton square in half horizontally and then in half vertically. Mark the folded corner with the washable marker – this is the center of the square.
- Unfold once so that the cotton is just folded in half. Tie a piece of string onto a washable marker to act as a compass to draw a half circle from the center point you just marked.
- Next fold in the bottom edge of the centerfold – this forms the legs of the peace sign.
- Fold the top edge of the centerfold down to meet it, so that the two edges sit side-by-side but do not overlap.
- This can be a tricky part: fold the cotton so that the line where the two edges meet is now the edge instead.
- Accordion fold along this edge – this will become the legs and center of the peace sign after dying.
- Once you get to the marker line for the edge of the peace sign, pivot the fold so that the marker lines up with the edge of the accordion fold.
- Keep accordion folding so that the marker line is straight.
- When you’re done folding, you should end up with something like this.
- Wrap an elastic just above the line, and another just below it. The area between these elastics will form the peace sign.
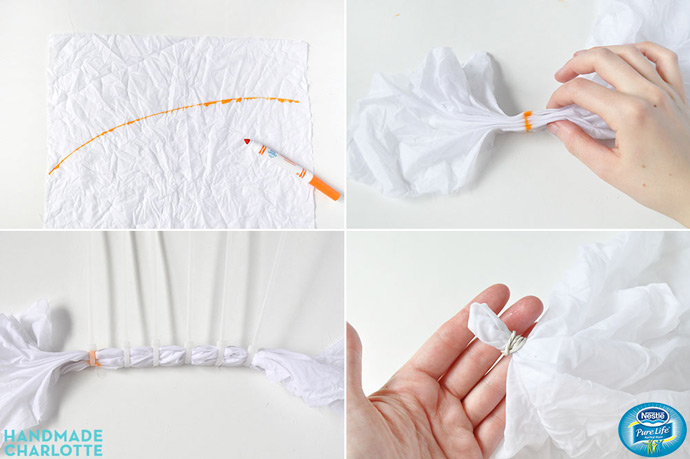
- Tie dying a rainbow is a super easy method: start with your damp cotton open flat and draw an arch across it. This will be the top/red area of the rainbow.
- Accordion fold along this line so that it looks straight, like with the other methods.
- Use a rubber band (or zip tie) to bind this marker line. Add more zip ties along the folded cotton to form the other segments in the rainbow.
- And a bonus option: if you’re tie dying with younger kids a simpler alternative pattern is the sunburst. Lay the damp cotton out flat and grab little bits of cotton and wrap tightly with an elastic as shown. Do a bunch of these all over the cotton – since this is a more abstract pattern, this is a great option for kids who aren’t quite ready for more structured designs.
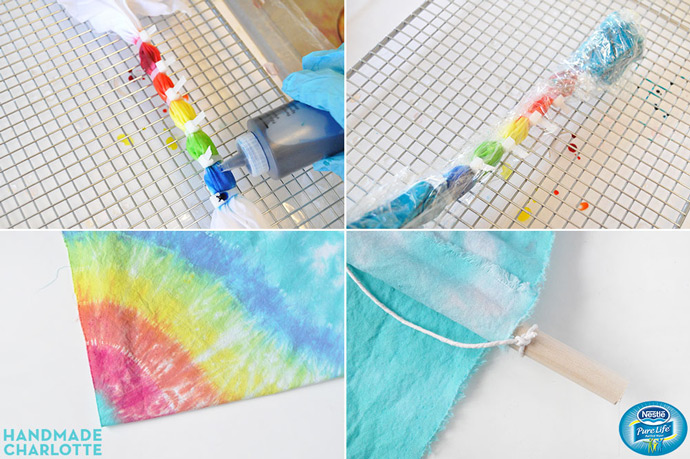
- Time to add some color! No matter your tying method, the dying part is essentially the same. Make sure your workspace is set up with a plastic tablecloth covering your table/counter with a wire cooling rack set up over it (or directly over the sink) so that your cotton doesn’t sit in puddles of dye. Prepare your dyes according to the package instructions, put your gloves on, and have a roll of paper towel ready. Squirt the dye onto each segment, changing colors as desired. Apply the dye on all sides of the cotton – flip it over on the rack as needed – careful to keep your hands from rubbing dye around on the cotton by mistake.
- When done dying, wrap the cotton with saran wrap or carefully put into a plastic bag. Let sit for 6-8 hours for nice vibrant colors.
- Once 6-8 hours has passed, carefully remove the saran wrap, cut off the elastic bands, and rinse in the sink until the water runs clear. Wash in the washing machine with hot water and a little bit of detergent, and then put in the dryer.
- Trim any of the threads from the edges and lay the cotton flat on the table. Put the wooden dowel across the top edge and fold the cotton over it forming a sleeve. Use small dabs of hot glue (or double sided tape) to secure the cotton sleeve. Finally, tie a piece of string to each side of the dowel for hanging.
Happy crafting!
Sponsored by Nestle® Pure Life®.