
We all love mom and everyone loves a good neon sign, so we put the two together for the perfect Mother’s Day craft. What mother doesn’t deserve to see her name in lights? With just a few basic supplies and 30 minutes of time to spare, you’ll be ready to turn out the lights and bask in the warm, neon glow. When the lights start to fade, simply replace the glow sticks to bring your sign back to life.

What You Need
- Printable glow stick neon sign template (download here)
- 18 in. by 24 in. black foamcore board (or other color of your choice for sign background)
- 19 1/2 in. by 3/4 in. strip of black foamcore board to cut for glow stick risers
- Black floral wire
- 1/2 in. black duct tape
- Clear tape (for affixing template to board to make holes)
- Eight 9 in. glow sticks
- One 22 in. glow stick
- Seam ripper
- Ruler (the project will be much easier if you have both a 1 in. wide ruler and a 3/4 in. wide ruler available)
- Craft knife
- Awl
- Wire cutters
- Scissors
Step 1

Download & print the template. Line up all three pages and tape together edge to edge, as indicated on the template, forming M♥M. On the reverse side of the sign board, find and mark the vertical and horizontal center lines. Line up the vertical and horizontal lines on the template with the vertical and horizontal lines on the sign board. After taping down the template, use the seam ripper to punch the holes as indicated on the template.
Step 2

Now you will need to make the risers to raise the glow sticks off the sign board, creating a realistic neon sign effect. Using your craft knife, cut 27 risers measuring 1 in. by 3/4 in. The easiest way to do this is to use a 1-in. ruler to cut a 1-in. strip of board measuring 19 1/2 in. long. Then cut the board into individual risers using a 3/4-in. ruler as a guide.
Cut 28 pieces of floral wire, each measuring 5 1/2 in. long. Cut the ends of the wire pieces at an angle to make it easier to push them through the sign board. Bend each piece of wire in half and use the awl to form a loop at the bend. These will hold the glow sticks in place on your sign board, with the added benefit of making the glow sticks easy to slide out and replace when they run out.
Step 3
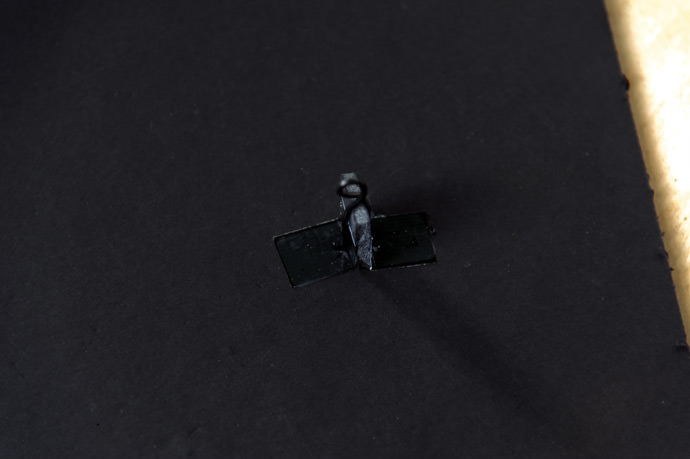
Cut 54 pieces of 1/2-in. black duct tape, each measuring 1 1/2 in. long. Attach the ends of the tape to the edge of your work table to have them ready for quick assembly. On the front of the sign board, attach the glow stick risers where indicated by the pattern of the holes (oriented with the 1-in. end vertical and the 3/4-in. end horizontal), using a piece of black duct tape on each side.
With the awl, re-punch the holes (now covered with black duct tape). For each riser, insert the ends of a piece of the floral wire you cut and folded earlier into the holes on each side. Push the wire all the way down until the wire loop rests on the top of the riser. Once the wire is in position, bend the ends of the wire along the reverse side of the sign board to secure in place.
Note: Each glow stick riser has one wire loop, except for the center of the heart shape, which has two wire loops to keep the ends of the heart in place.
Step 4

Crack the glow sticks to activate. Thread the 22-in. glow stick into the heart-shaped riser loops in the center of the sign board, starting at the bottom of the heart and carefully guiding the glow stick through each wire loop until the shape is complete. Next, thread the 9-in. glow sticks to create the two Ms on each side of the heart.
Happy crafting!