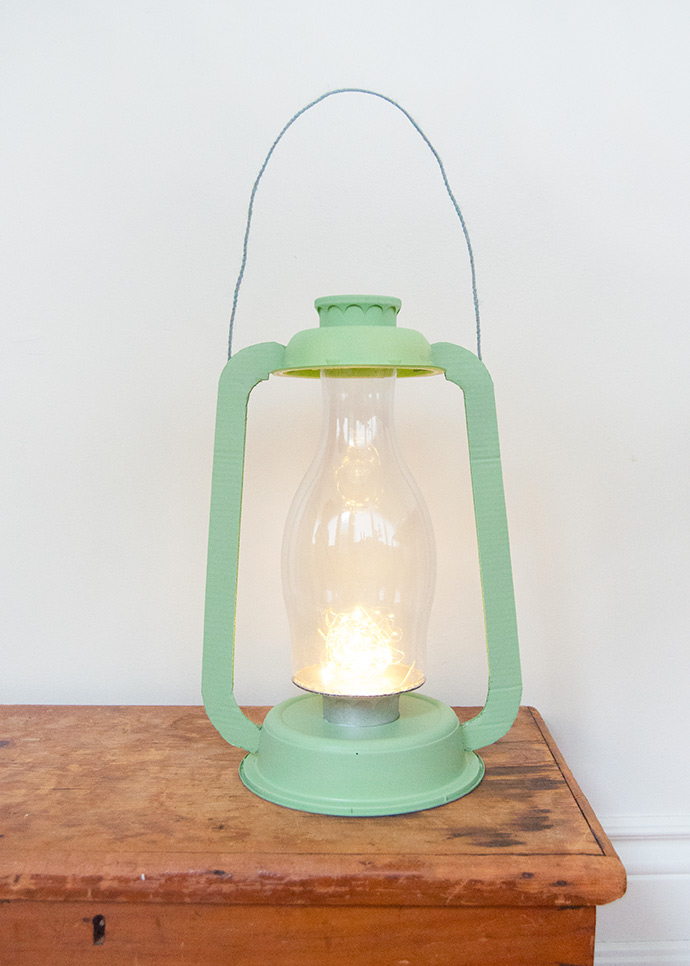
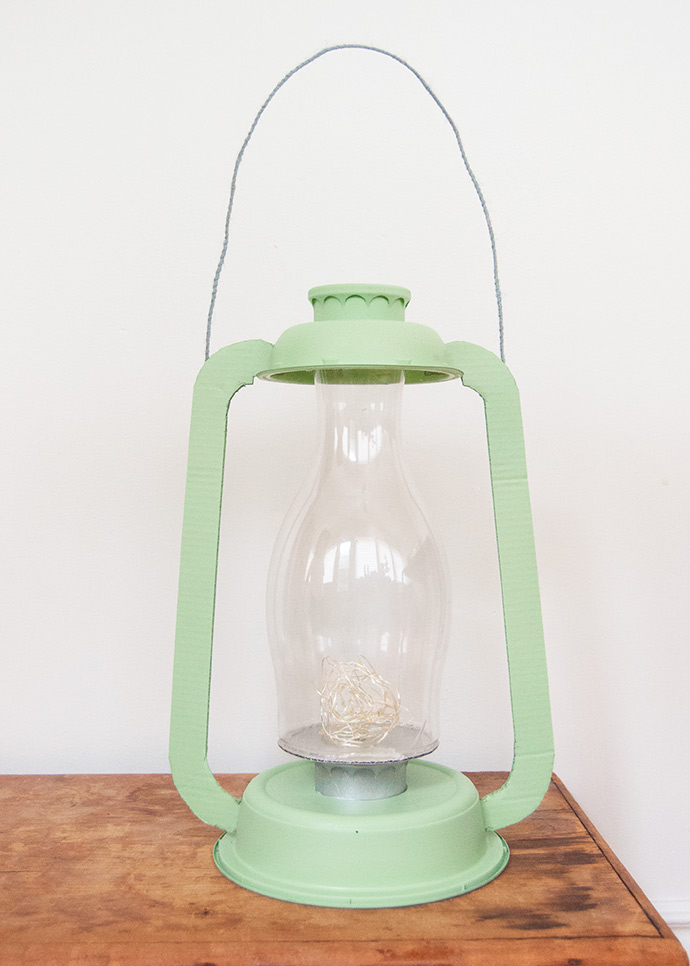
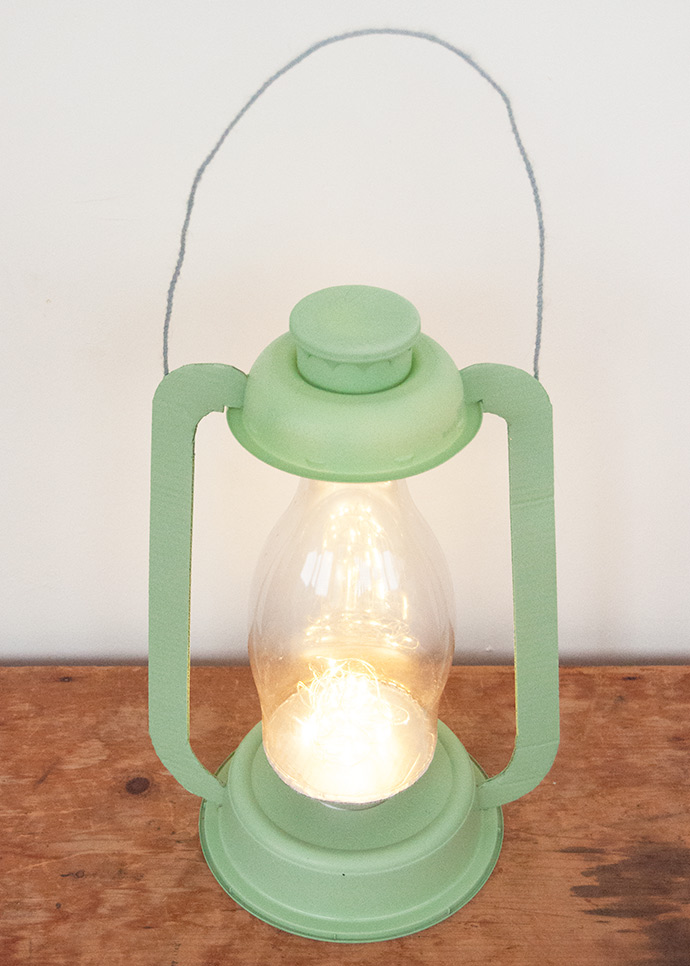
Ever since seeing Arielle make these beautiful upcycled vases from almond milk bottles, I’ve had these bottles in the back of my brain. Not too long ago I saw an oil lantern illustration while scrolling Instagram and it hit me that these milk bottles are the perfect shape for crafting your own camp lantern! Search through your recycling bin for all the containers and cardboard you need, and grab LED string lights from the dollar store. The finished lantern is surprisingly realistic, don’t you think? Read the full how-to below, or watch the video on Instagram.
what you need:
- Empty clear plastic bottle (we used Califia Farms brand)
- Two lids (we used lids for the same Califia Farms bottle)
- Take out container (or similar)
- Dip container
- Corrugated cardboard
- LED string lights
- Spray paint (green and silver)
- Craft knife
- Cutting mat
- Scissors
- Glue (hot glue or stronger plastic-friendly glue)
- Packing tape
- Wire
- Drill and drill bit
how-to:
Step 1
Assemble, wash, and dry all the recyclable components. Stack them up to get an idea of the size and shape of your lantern and then use a pencil and cardboard to make a rough version of the cardboard strips that go on each side of the lantern. Getting this shape right can be a little finicky, so don’t worry about how rough this first template is. Just make sure the ends of the strip align with the base container and top container so that they can be inserted there later. Once you have a rough template, trace and refine this shape onto corrugated cardboard and cut out two using a craft knife.
Assemble, wash, and dry all the recyclable components. Stack them up to get an idea of the size and shape of your lantern and then use a pencil and cardboard to make a rough version of the cardboard strips that go on each side of the lantern. Getting this shape right can be a little finicky, so don’t worry about how rough this first template is. Just make sure the ends of the strip align with the base container and top container so that they can be inserted there later. Once you have a rough template, trace and refine this shape onto corrugated cardboard and cut out two using a craft knife.
Step 2
Hold the cardboard strips up to the lantern and use a marker to draw approximately where the slots will need to be. Use a craft knife to carefully cut these slots on opposite sides of the containers. Start small, test if the cardboard fits in, and cut larger as needed.
Hold the cardboard strips up to the lantern and use a marker to draw approximately where the slots will need to be. Use a craft knife to carefully cut these slots on opposite sides of the containers. Start small, test if the cardboard fits in, and cut larger as needed.
Step 3
Use a craft knife to carefully cut out the bottom of the oat milk bottle.
Step 4
Trace the bottom of the bottle onto a piece of cardboard and cut out.
Step 5
Drill a hole through the center of the cardboard circle, one of the bottle lids, and the base take-out container. Make sure this hole is large enough for the LED string lights to fit through.
Drill a hole through the center of the cardboard circle, one of the bottle lids, and the base take-out container. Make sure this hole is large enough for the LED string lights to fit through.
Step 6
Spray paint the cardboard circle and the bottle lid with the hole in it silver and set aside to dry completely. Paint the remaining pieces (other than the clear bottle – leave that unpainted) in green or any other color. Let dry.
Spray paint the cardboard circle and the bottle lid with the hole in it silver and set aside to dry completely. Paint the remaining pieces (other than the clear bottle – leave that unpainted) in green or any other color. Let dry.
Step 7
Feed the end of the LED string light through the bottom of the take-out container, then through the bottle lid, then through the cardboard circle. Pull the lights all the way through and bunch them together into a ball. Use glue to secure these three pieces together, and then use tape to attach the battery pack into the bottom of the take-out container.
Feed the end of the LED string light through the bottom of the take-out container, then through the bottle lid, then through the cardboard circle. Pull the lights all the way through and bunch them together into a ball. Use glue to secure these three pieces together, and then use tape to attach the battery pack into the bottom of the take-out container.
Step 8
Glue the bottom edge of the bottle to the silver circle.
Step 9
Glue the dip container and the other lid to the top of the bottle.
Glue the dip container and the other lid to the top of the bottle.
Step 10
Insert the cardboard strips into the slots, gluing to secure if needed.
Step 11
Cut a piece of wire to be the handle, and glue to the backs of the cardboard strips.
Cut a piece of wire to be the handle, and glue to the backs of the cardboard strips.
Note: we used hot glue and white tacky glue for this lantern, and so far it’s held up great through gentle use. If you plan to use your lantern for more than just decoration, you’ll likely want to use a stronger glue that’s suited to plastics to make sure all the bonds between the containers are strong and secure.
Happy crafting!