
Grab some pantry staples and make this oven-bake clay! We had so much fun experimenting with this recipe. I’ve long admired speckled pottery, so making it at home is so satisfying, and a little addicting too! I first made baking soda-cornstarch clay a few years ago now for some Christmas ornaments and I loved how they turned out. The clay was really easy to work with, the materials are super cheap, and they’ve lasted beautifully over the past few years. It’s been a while since I’ve tried making salt dough, but from what I remember, it was a lot drier and more brittle, and also tended to form air pockets unpredictably. I love how this baking soda and cornstarch clay stays flat, and starts out really pure white. As noted below, I added cinnamon, coffee, and black pepper to the clay to make different effects. Play around with this until you get what you like. See the how-to video on IG reels here.
what you need:
- 1 cup baking soda
- 1/2 cup cornstarch
- 3/4 water (with a splash of coffee mixed in)
- sprinkle of cinnamon
- freshly ground black pepper
how-to:
Step 1
Add all the ingredients to a saucepan over medium heat and stir to combine. Continue stirring nearly constantly.
Step 2
After a few minutes, the mixture will start to thicken up. Continue stirring until it’s about the texture of mashed potatoes. Remove from heat.
Step 3
Transfer the hot clay to a clean bowl and cover. Let cool completely.
Step 4
Preheat your oven to 175F. On a piece of parchment or any clean surface, roll out the dough to a thickness of about 1/4″. Sprinkle more pepper on top if desired and gently roll again to press this new pepper into the surface of the clay.
Step 5
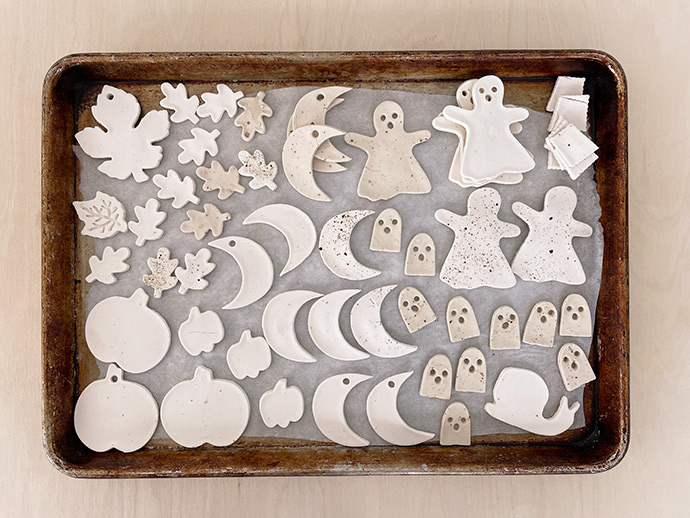
Use cookie cutters to cut out shapes and transfer them to a parchment or foil-lined baking sheet.
Step 6
Bake for 1 to 2 hours, flipping the pieces every 20 mins or so. Check them often to make sure they don’t burn. Bake time will vary depending on the size and shapes of your pieces. Make sure to bake them completely – if they’re still a bit damp/soft, they can warp and bend as they air dry later.
Step 7
If using as ornaments, string cord through the holes and tie a loop. Or, attach a pin to the back to make a brooch! We also made standing figures by cutting out and baking a small rectangular stand from clay, and then gluing this to the back of the ghost.
Step 8
You can also choose to apply a coat of sealer on top if you want a glossier look.
Happy crafting!