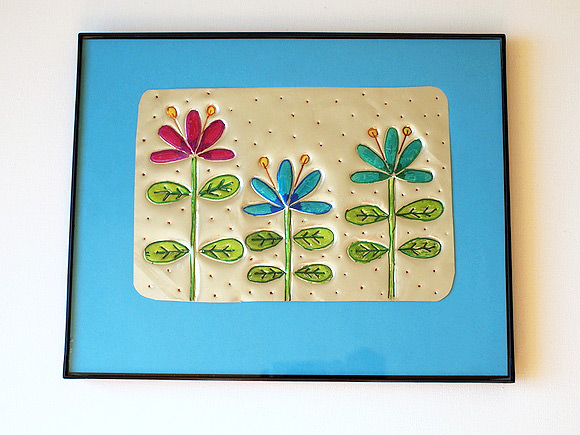
Spring is just around the corner. Let’s get into the spirit with this DIY tin art project that you can frame and hang on the wall. All the materials are affordable and easy to obtain. (You probably even have most of them lying around your home right now!) Easy and fun to make, this would be a great craft for children to get involved in. They’ll love seeing their artwork become special gifts for loved ones.
Let’s get started!

What You Need
- Disposable baking pan
- Scissors
- Piece of paper
- Pencil
- Pen
- Masking tape
- Napkin
- Sharpie markers
- Frame
- Notebook or magazine
- Optional: Colored scrapbook or card-stock paper
Step 1
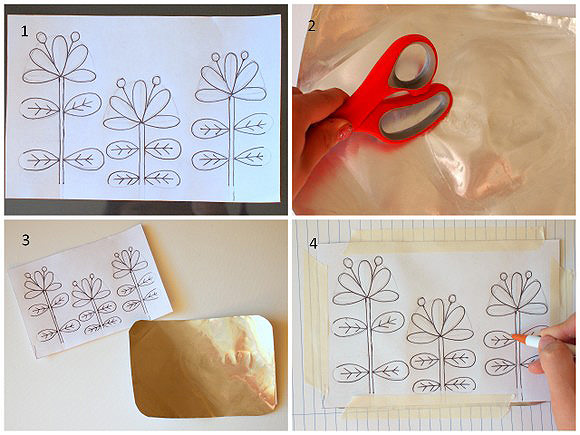
Pull out the glass from your frame and cut out a sheet of paper that’s the same size or smaller than the glass. Then, doodle a design on your piece of paper.
Step 2
Cut out the bottom from your baking pan. (Be careful! The edges could be sharp.) Then, rub the handles of the scissors against the baking pan to flatten out any bumps.
Step 3
Place your drawing on top of your baking pan and trace around it. Then, cut out the traced rectangle from the baking pan. (Be careful! Your corners might be too sharp for kids’ hands, so round off your edges.)
Step 4
Place your drawing on top of your baking pan rectangle and tape both onto your notebook. Transfer your drawing onto the baking pan by tracing over your design with your pen. Be sure to press down hard.

Step 5
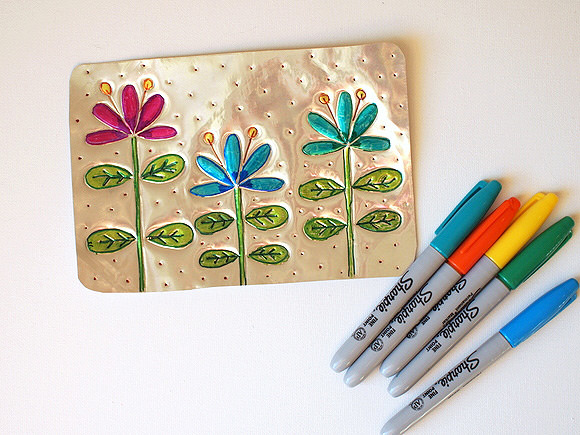
Pull off your sheet of paper and examine your design. If you want to make the indentations deeper or add more details, simply use your pen to draw directly onto the baking pan. Your pen might leave a slight ink residue, so use your napkin to carefully wipe that off.
Step 6
Pull out your Sharpie markers and start coloring in your design. Warning: The Sharpie marker tends to wipe off the baking pan if you touch it too much. To prevent that from happening, color your design from from left to right (if you’re right-handed) so you won’t accidentally wipe anything off.
Step 7
Place your artwork into your frame. If you’d like to add a colorful mat, cut out a piece of colored card stock that’s the same size as your glass. Tape your tin art to the card stock and then tape the card stock to the back of the frame. Remember to be careful and not smear your Sharpie artwork!
Hooray, you’re done! Friends and family will certainly love receiving this piece of personalized artwork. Plus, your kids will feel proud that they made something so lovely and special.
Happy crafting!