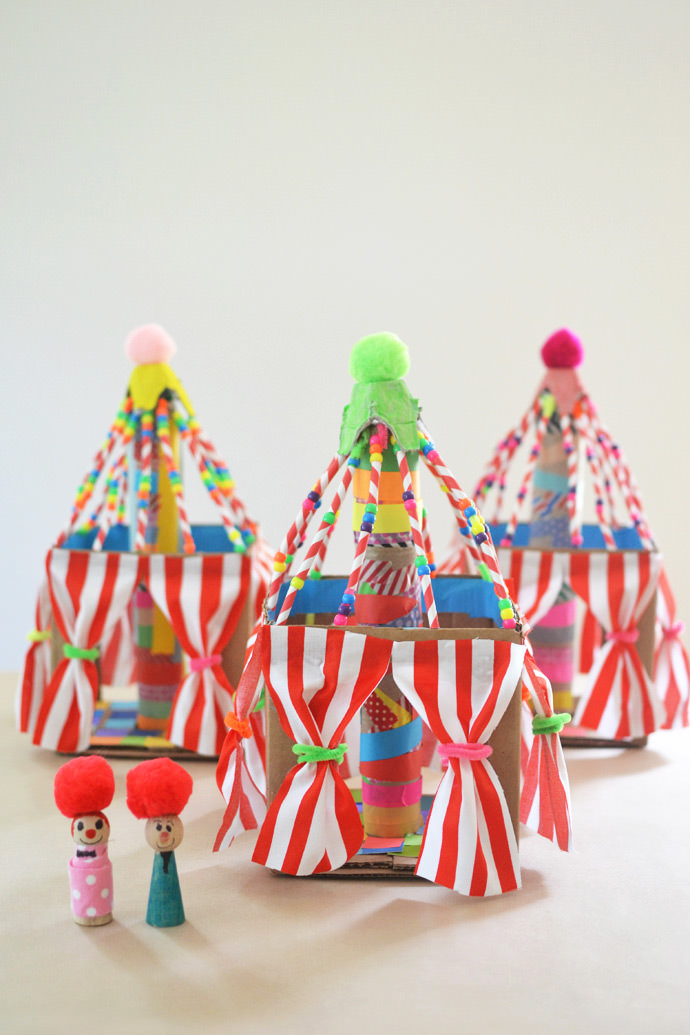
Every summer I teach an art camp at my house for kids ages 4-8. Our kickoff week was called Join the Circus! We made clown masks, trapeze mobiles, ice cream cones, and lots of cheery bunting. Our favorite project were these spectacular circus tents! Completing the crafts almost completely on their own, the kids were so proud of their colorful new toys… and their teacher was pretty proud, too :) I’m excited to share with you the tutorial and for your little ones to experience the magic of the Big Top.
What You Need
- A small cardboard box (about 8” x 8” x 6”)
- Scissors and an exacto knife
- One cardboard paper towel tube
- Single hole punch (1/8”)
- White school glue
- Washi tape
- Pipe cleaners
- Beads (we used pony beads and cut-up paper straws)
- Duct tape
- Colored paper cut into little squares (for the floor)
- Red striped fabric (or paint/color your own stripes on white fabric)
- Egg carton (cut into individual cups)
- Tempera paint
- Several small paint brushes
- Pom-poms (one large for the top of the tent)
How-To
Step 1
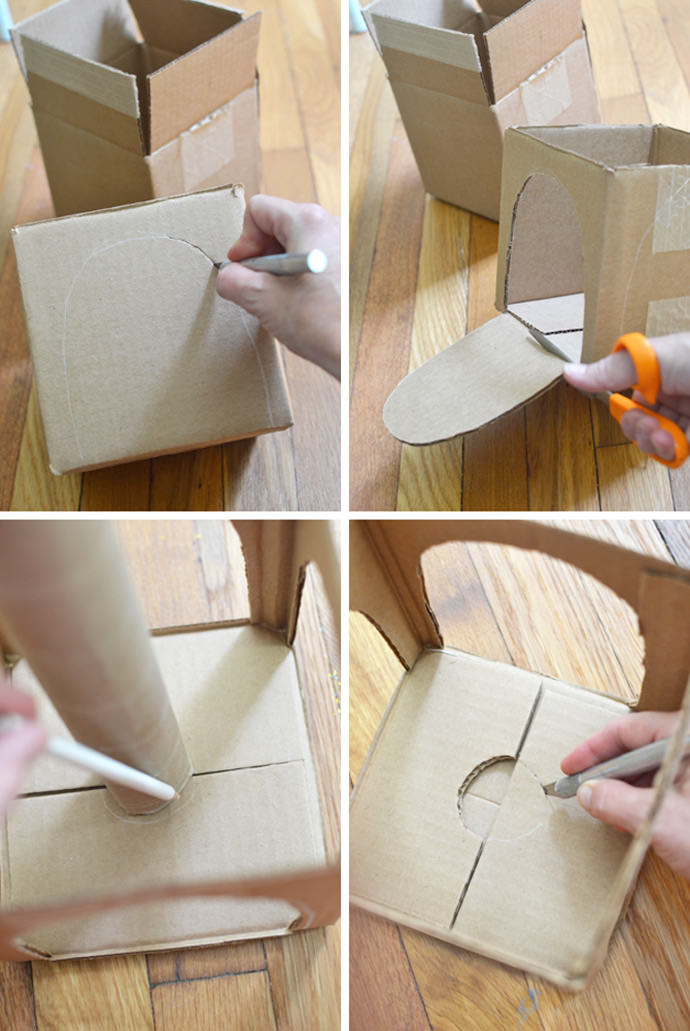
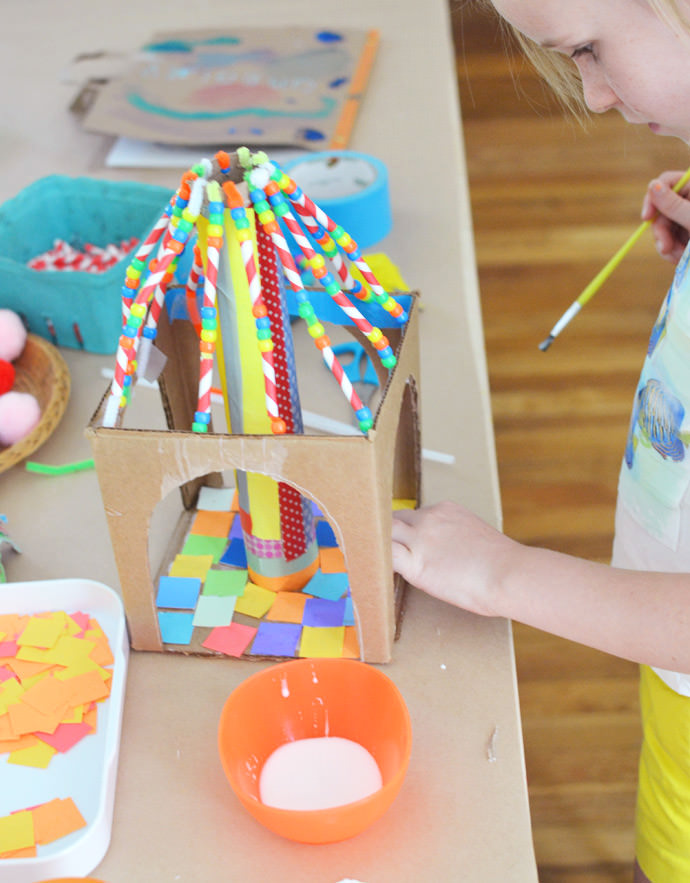
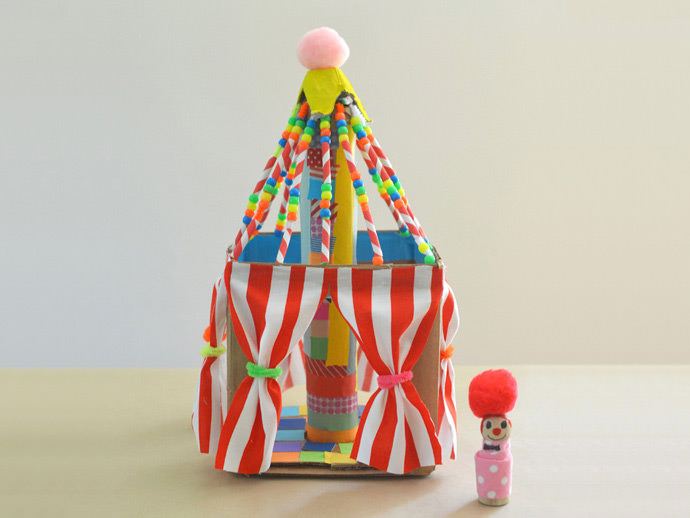
Prepare your box, as shown above. Use scissors to cut off the top flaps of the box. Draw an archway on all four sides, then cut each out with the exacto. Trace the circumference of the paper towel roll on the bottom of the box, in the center. Now cut out the circle on the top layer of the bottom flaps (see bottom right image). Make sure not to cut through both flaps! This is important.
Step 2
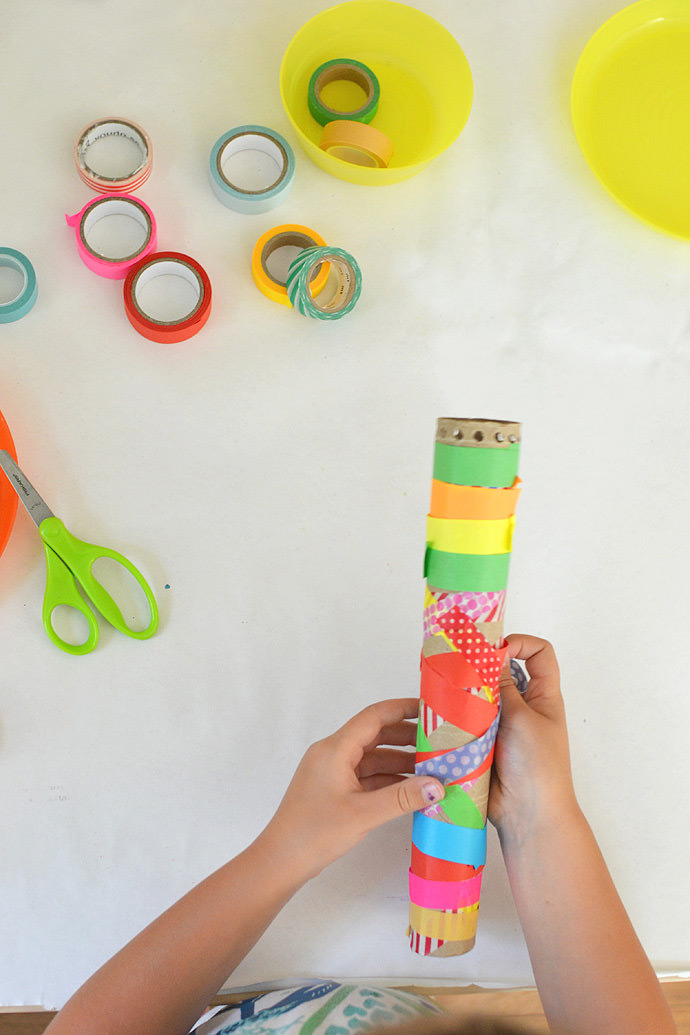
Use your hole puncher to punch holes around the top of the paper towel tube. These will be used later to attach the pipe cleaners.
Now for the fun part! Let the kids cover their paper towel roll with washi tape (this could be a fun activity even without making the tents!) The kids can either rip the tape with their fingers, or use small scissors.
Step 3
Glue the paper towel roll into the bottom of the box. Let dry overnight.
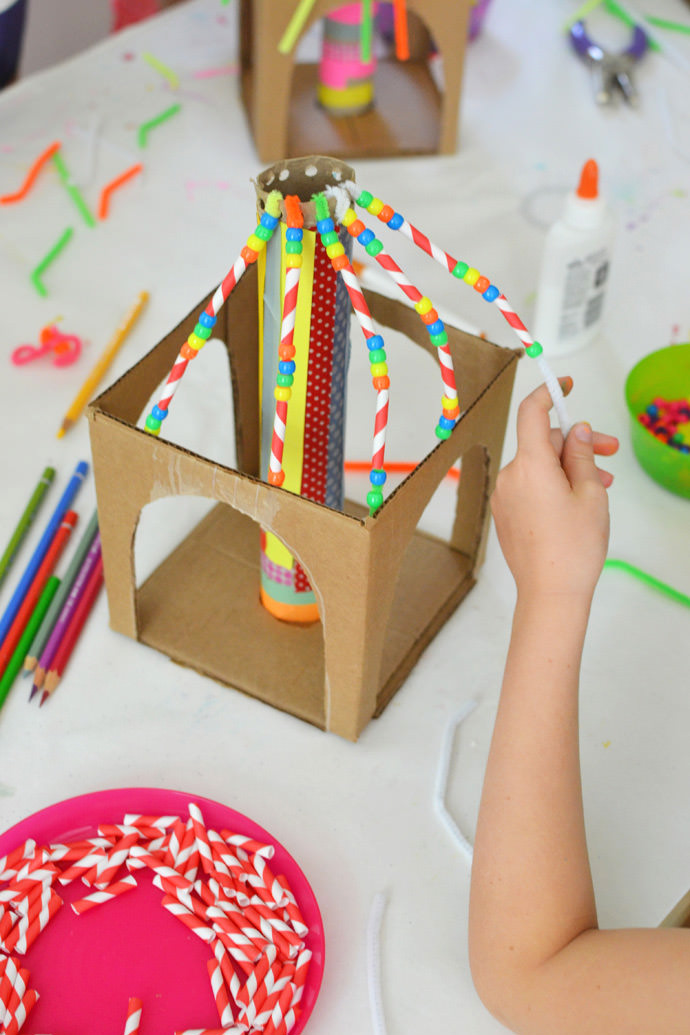
Once the frame of your tent is good and dry, string pipe cleaners through approx. half the holes at the top of the paper towel roll. Let the kids bead the cleaners until they reach the top of the box. Then use duct tape on the inside of the box to secure the other end of the pipe cleaner (we used colored duct tape to make the inside of our tents as fun as the outside). Continue beading the pipe cleaners all the way around until a roof is formed.
Step 4
Now it’s time to tile the floor. Gather up all your pieces of cut paper. Pour some glue into a little bowl and use a paint brush (I like using the ones that come with paint sets) to stick down the papers.
This is optional. You can always just squeeze straight from the glue bottle, but using a bowl and brush makes it easier to reach inside the box, plus kids tend to use less glue.
Step 5
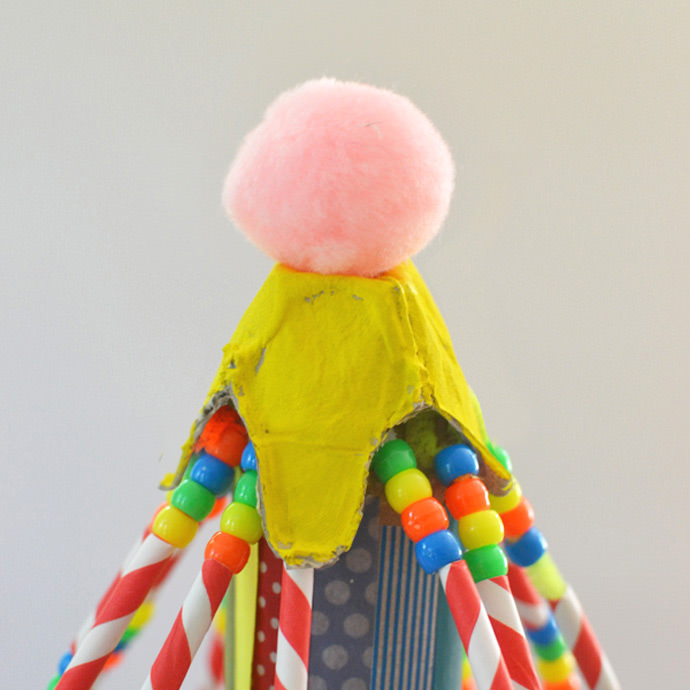
Pour a little bit of tempera paint into a few small bowls (I used yellow, light green, pink, and light blue). Choose your roof color and paint the outside of your egg carton cup. Glue the carton cup facedown to the top of the tube. Add one big pom-pom of a different color.
Step 6
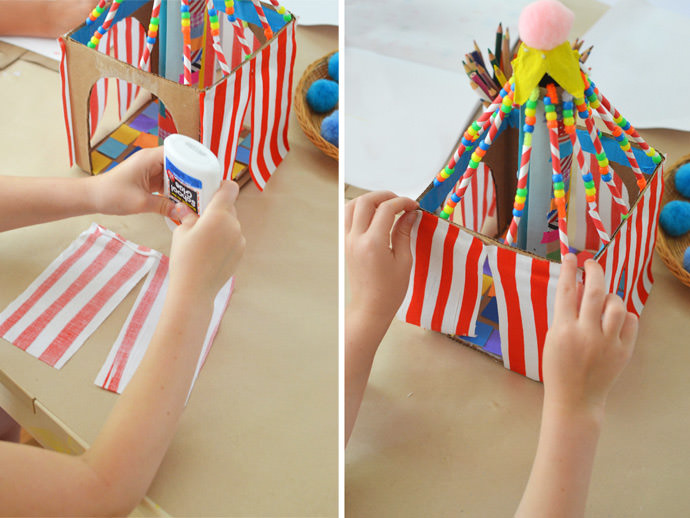
Cut out a piece of the striped fabric to fit a side of the box. Now use this as a template to cut three more. Cut a slit up the middle of each piece of fabric, making sure to stop just before reaching the top. Glue all four pieces to the sides of your box using craft glue.
Step 7
Pull back the curtains with small pieces of pipe cleaner (I simply cut a regular pipe cleaner in half).
We completed this project over the course of three days. Every day the kids arrived so excited to continue making their tents! It was a labor of love, but they never got tired of working on them. Between taping rolls, beading pipe cleaners, tiling floors, and cutting curtains, there was enough variety that each new step seemed fresh and exciting!
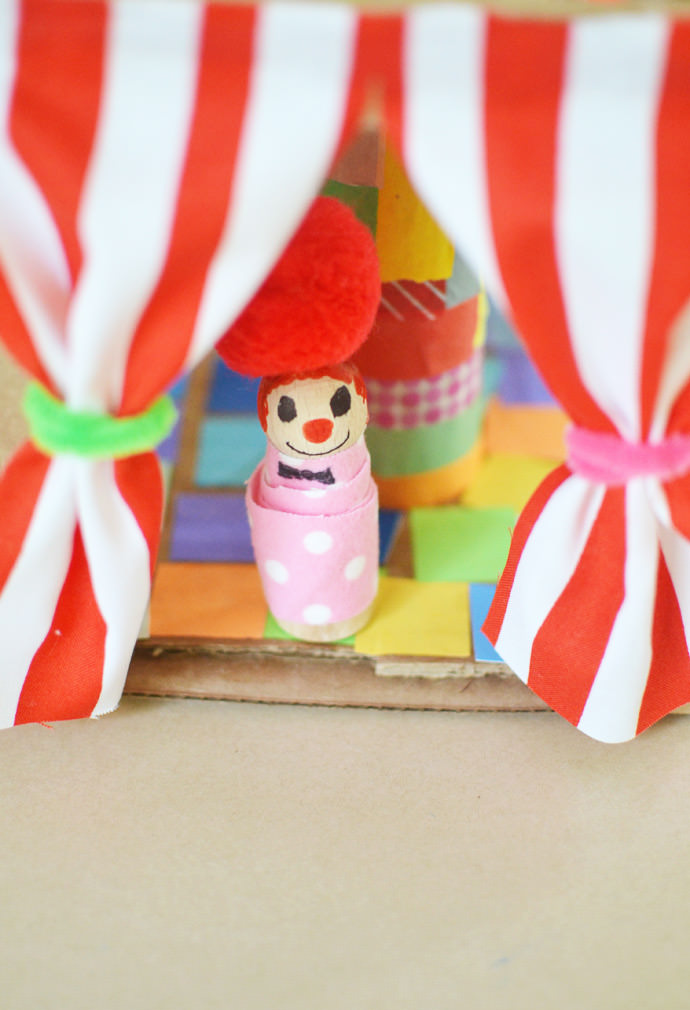
Oh! And the little clowns were made by the kids and my 14-year-old assistant (who happens to be my lovely daughter). I was off cleaning up and when I came back, they had found the pegs and added fabric clothes, a pom-pom hat, and a black sharpie face. You can find the materials for these wooden people at any craft store.
I hope you have a big time under the Big Top! There is nothing better than a toy made by a child’s own hands :)