
Say hello to your new best friend – this DIY paper plate rainbow puppet! Haven’t you always wanted a rainbow friend that can dance and do jazz hands? We did so we had a blast crafting this playful puppet. We are longtime fans of using paper plates in crafts (a few examples: these painted llamas, these handmade sun visors, and of course this flock of birds) so naturally, we embraced paper plates yet again – when you cut them in half, they’re really the perfect rainbow shape!
We love how playful and happy this rainbow puppet turned out – wouldn’t a whole bunch of them together be the best puppet show ever? You could even make a few other shapes using this same technique – a cloud (the tissue paper strips could be spring showers!), a bright yellow sun, an airplane, or even a hot air balloon! The possibilities are endless and we can’t wait to make even more puppets with paper plates soon. See the DIY video below, as well as written instructions, to make your very own rainbow puppet!
what you need:
- Paper plate
- Apple Barrel Colors Acrylic Paint
- Paintbrushes
- Scissors
- Black marker
- Tape
- Wooden skewers or dowels (two)
- Tissue paper (to match paint colors)
- Black elastic
- White or clear thread
how-to:
Step 1
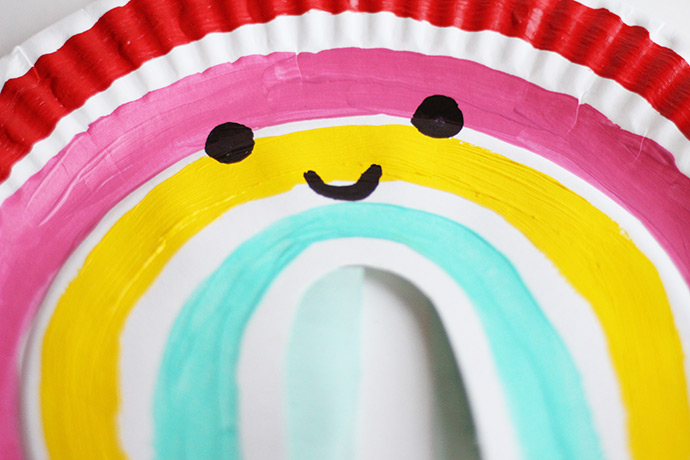
Begin by taking a plain white paper plate and cutting it in almost half – you actually want it to be slightly larger than the half, as shown in the video. Cut a little arch out of the middle so that you get a rainbow shape.
Time to paint! We used four shades on our rainbow and just brushed them on freehand with a paintbrush. Let the stripes dry and then use a black marker to draw on an adorable face.
Step 2
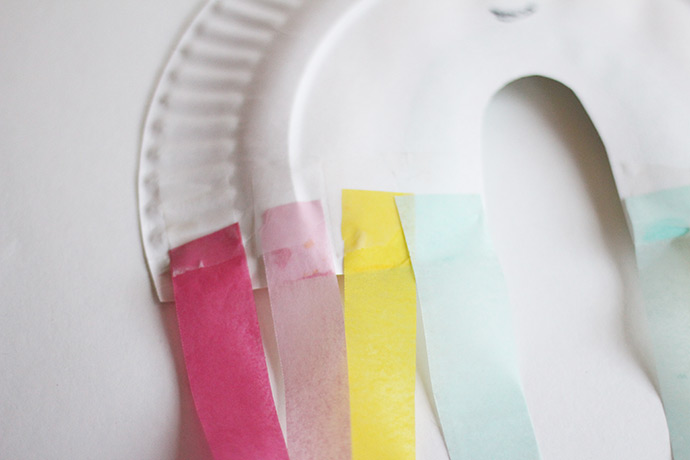
Cut strips of tissue paper in matching colors and tape them onto the back of the paper plate. The tissue paper strips should line up with the rainbow arches on the front. The tissue paper strips can be as long or as short as you like! These ones are about 18″ long.
Step 3
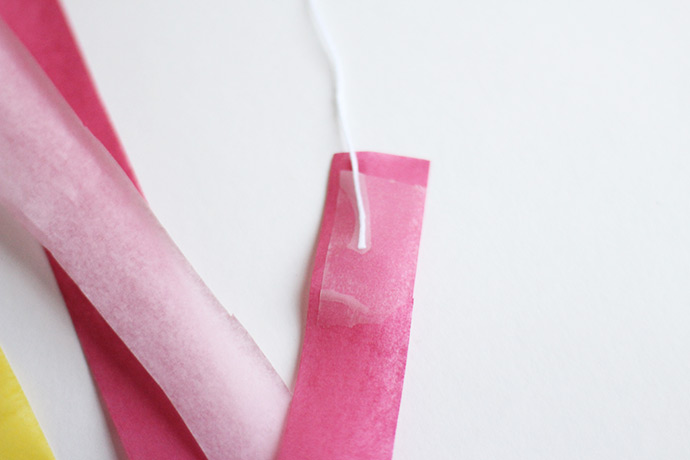
The outermost tissue paper strips will be your rainbow’s arms! Cut two pieces of white or clear string (keep them long for now, we’ll trim them later) and tape one end of each onto the back of the outermost tissue paper strip as shown above.
Step 4
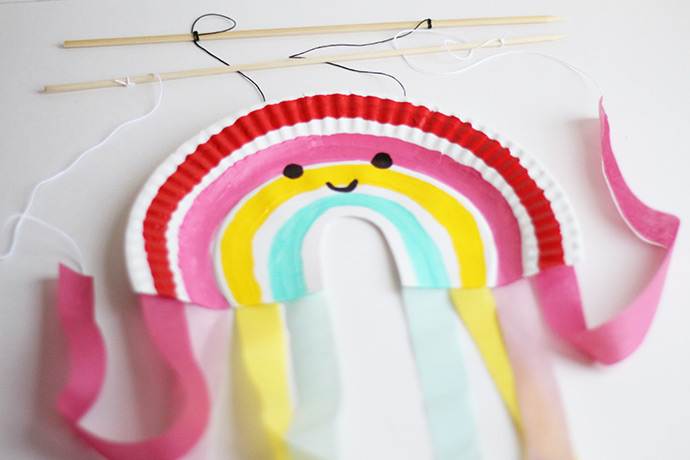
Now cut two pieces of elastic and tape them to the top back of the paper plate. Tie the other two ends onto one wooden skewer so that there are at least a few inches between the skewer and the top of the puppet.
Take the loose ends of the white string from before and tie those two ends onto another wooden skewer. This will be the control to move the rainbow’s arms separately from the rest of the body, so play around with the length of the string here so that you’re happy with the movement.
If you want to make a puppet that needs two people to operate it, you could even tie the two arm strings onto separate sticks and control them separately with the help from a friend!

Happy rainbow crafting!
Photo and video by Caroline Gravino
Creative direction by Handmade Charlotte