NOTE: This Part 3 of an 11 part series – Eva really went for it with this project! Here are the links to all the parts in the series: Part 1, Part 2, Part 3, Part 4, Part 5, Part 6, Part 7, Part 8, Part 9, Part 10, and Part 11.
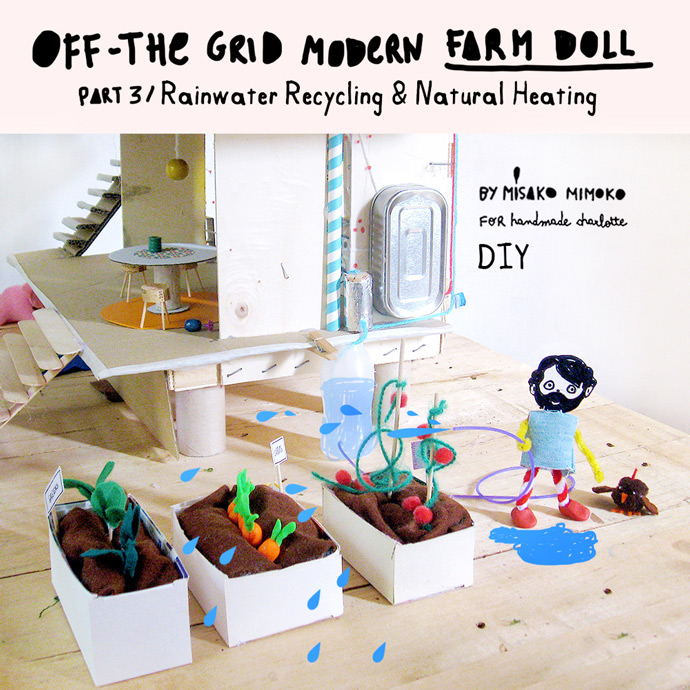
Are you ready for part three of our DIY off-the-grid dollhouse series? In today’s tutorial, we’ll be creating a few new stand-alone energy systems to make our farm self-sufficient: rainwater harvesting and natural heat systems. It’s time to get our farm off of city water and create solar and geothermal heating systems!
In this article, you and your kids will learn about one of the easiest ways to be eco-friendly: collecting and reusing rainwater, as well as how to use some of the Earth’s natural resources in your living space for water heating. Since this project is all about being eco-friendly and protecting the environment, try to recycle and repurpose materials to make your ultimate eco-dollhouse!
What You Need
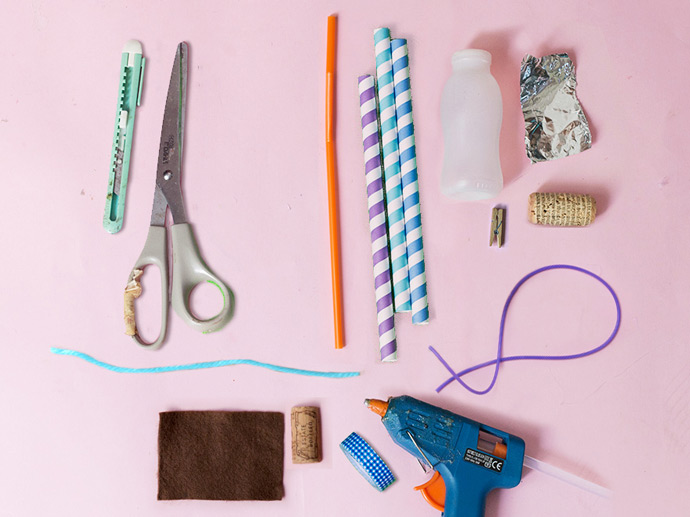
- Hot glue gun
- Scissors
- Craft knife
- Burin
For the Solar Thermal System
- Yarn
- Tape
- Plastic bottle (small juice/yogurt container)
- Aluminum foil (optional)
- Cork
For the Rain Collector
- Drinking straws
- Mini clothespins
- Plastic lanyard cord
For the Geothermal Heating System
- Bendy drinking straw
- Cork
- Felt
How-To
Part 1: Solar Thermal Water Heating System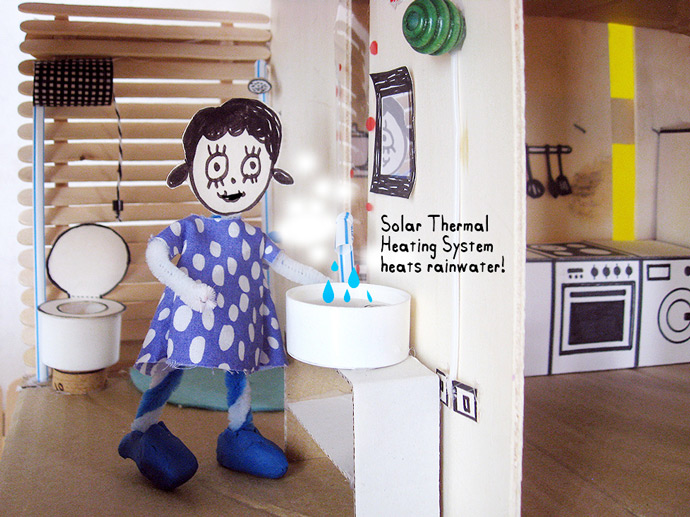
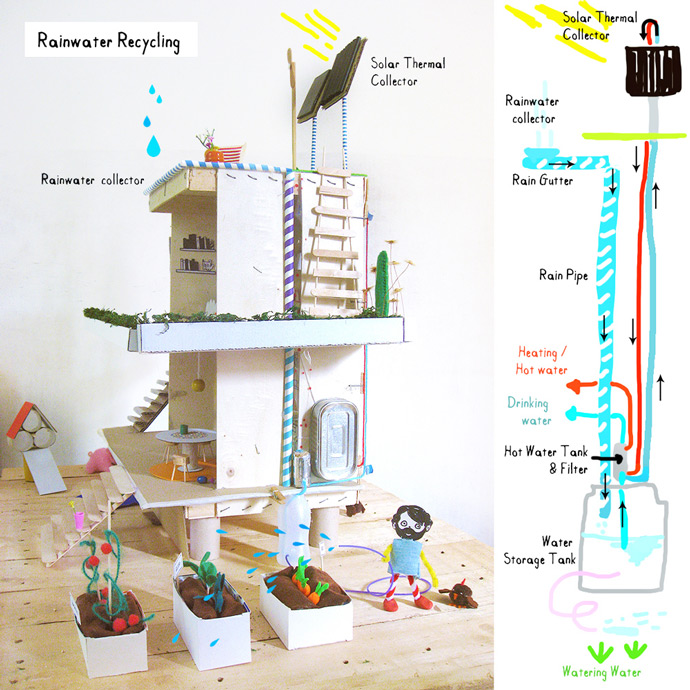
Let’s collect some of the power we need from the Sun! Solar thermal systems use sunlight to produce hot water.
The solar collector is the heart of the solar thermal system – it absorbs solar radiation from the Sun, converts it into heat, and then transfers the useful heat to the tank water.
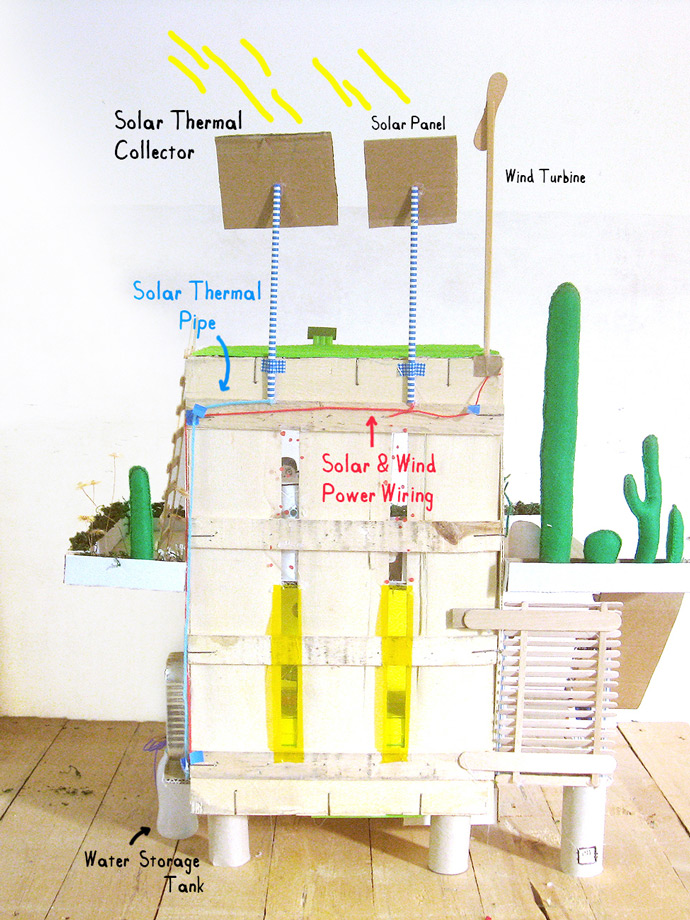
In the previous tutorial, we made our solar collector and glued it to the back of the building. Now we have to install pipes to connect it to the rest of the heat system: the water tank and the filter, which produce hot and safe-to-drink water. The Solar thermal piping (blue yarn) should be installed the same way as the Solar and Wind power wiring (red yarn).
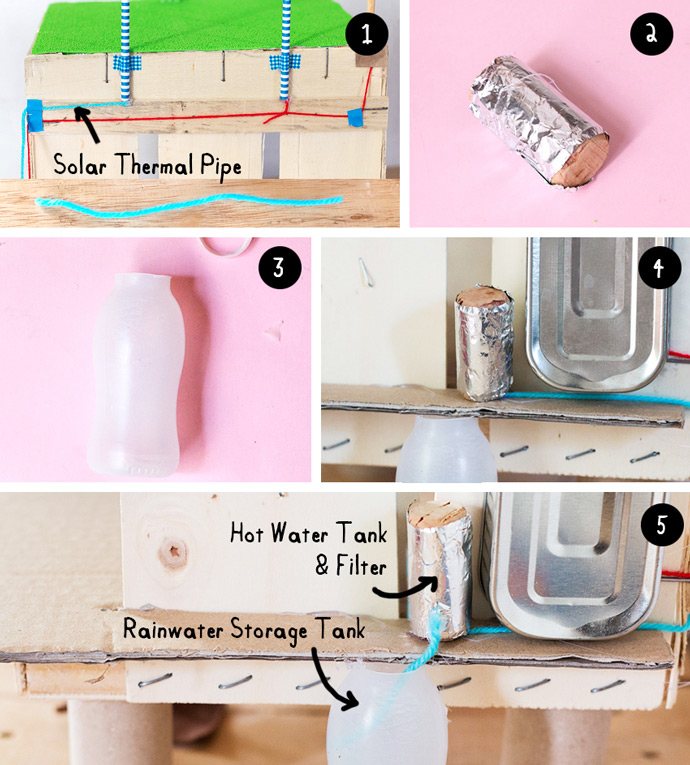
1.1. Take a long piece of yarn and glue one end to the solar thermal collector panel bottom, then pass yarn down all along the backside of the building, attaching it with tape.
1.2. Cover a cork with aluminum foil to make the hot water tank and water filter. Place it at the ledge of the first floor next to the tin can (control box) using tape to attach it temporarily if, needed.
1.3. The plastic bottle will be used as the rainwater storage tank. It will be installed between the first floor and the ground, so cut off the top of the bottle as needed so that it can fit in snugly.
1.4. Put the plastic bottle directly below the hot water tank, under the first floor ledge. Tape another piece of blue yarn onto the bottom the hot water tank and feed it into the bottle.
Here is the final solar thermal system with the pipes (blue yarn) that connect the solar collector to the hot water tank and filter (cork). There’s also the pipe that uses the filter to get the water from the rainwater storage tank (bottle).
This tank gets its water from harvested rain.
Rainwater harvesting is the process of collecting, filtering, storing and using rainwater for potable water (drinking, cooking, bathing) or non-potable uses like landscape irrigation, livestock watering and washing. There are numerous benefits to harvesting rainwater, including improved water quality and lower hardness levels (which reduces the amounts of soaps/detergents needed when washing). The rainwater-harvesting system directs rain gutters to a water storage tank.
Part 2: Rainwater Harvesting
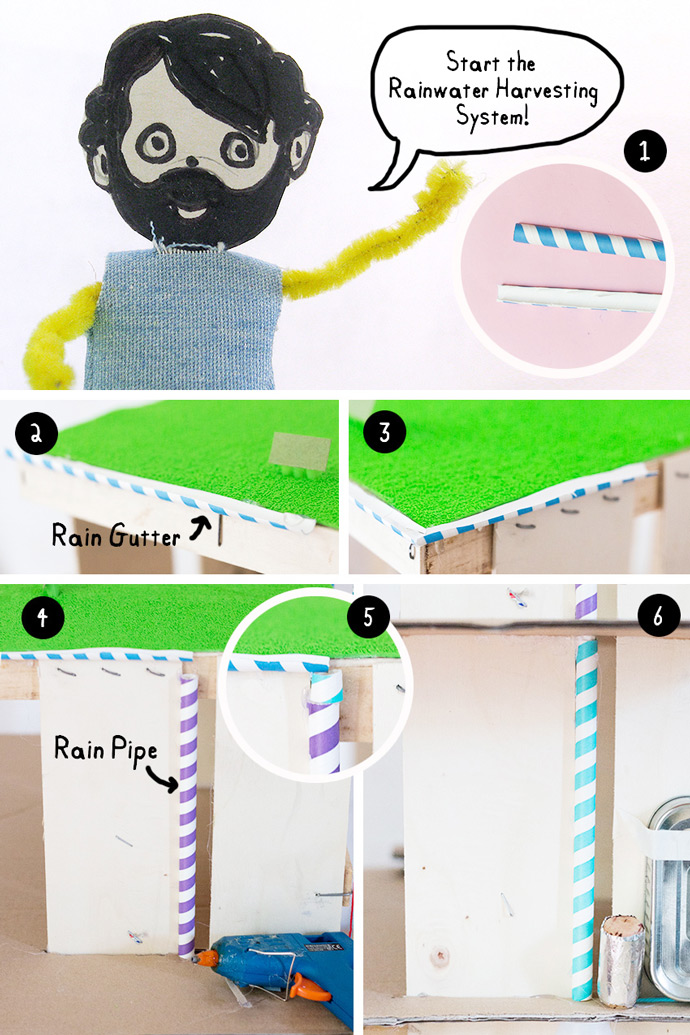
2.1. Cut several drinking straws in half vertically to make rain gutters. Keep some straws as-is for the vertical rain pipes.
2.2. Glue the half straws all along the front edge of the roof, one next to the other until you reach the corner.
2.3. Cut off the excess straw at an angle and continue attaching the gutters along the next side. Draw a vertical line in pencil from the water tank to the gutter – this is where the gutter will end. Take another half straw, cut the end at an angle, and place it along the roof from the corner to the pencil line, cutting to fit.
2.4. Rain pipes will be installed here along the pencil line. Apply hot glue vertically, and attach a whole straw on the first floor directly onto the line, right under the end of the gutter. This way, the rainwater goes down it and is directed down to the bottle tank.
2.5. If the straw is too short to reach the end of the gutter, add small pieces of straw to fill the gap.
2.6. Keep adding more straws from first to ground floor. The bottom of the last straw should be right beside the hot water tank (cork) and above the bottle mouth.

2.7. Add a hose to the rainwater tank by punching a hole in the front bottom of the bottle with an awl.Thread a piece of the plastic lanyard cord through the hole to act as the hose.
2.8. Put the bottle back in place and roll up the lanyard string, using a mini clothespin to keep it fixed to the ledge.
2.9. To connect the filter to the rainwater tank, cut a short piece of yarn and glue one end to the bottom of the hot water tank and place the other end into the rainwater tank (bottle). This will act as the pipe and allow the filter and hot water tank to get rain water from the tank.
Part 3: Creating the Geothermal Heating System
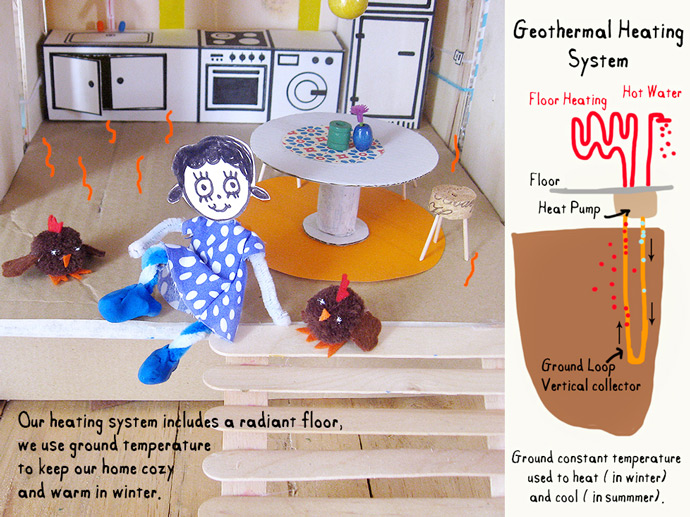
Geothermal energy is heat from within the earth; it’s a renewable energy source because the heat is continuously produced inside the earth.
The kitchen’s radiant floor, which we installed in the first tutorial, will be heated by a geothermal heat pump. It uses the earth’s constant temperature as a heat source – it transfers this heat from the ground (or water) into buildings during the winter and cools in the summer. Our geothermal heat pump hot pipes water directly into the radiant floor from a vertical closed loop collector bored in the ground for heat.
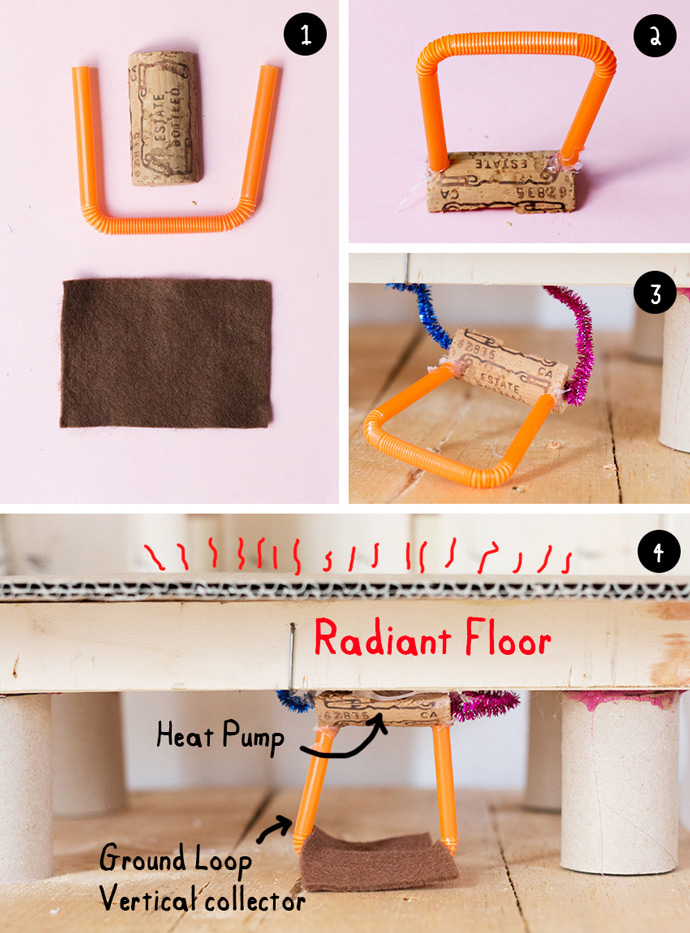
3.1. To make the heat pump, cut a cork vertically in half. To make the vertical collector loop, take a bendy drinking straw and bend it to form a U-shape. Place the half-cork under the first floor and measure the distance to the ground, cutting the U-shaped straw to fit. Cut a piece of brown felt the same width as the U-shaped straw.
3.2. Time to connect the ground vertical loop connector to heat pump: to do this, glue both ends of the vertical collector loop (straw) to the center of curved side of the heat pump (cork).
3.3. Now let’s connect them to the radiant heating floor! Glue each end of the radiant floor installation (pipe cleaners) to each side of the cork.
3.4. Since we don’t want to make a hole in the table (which is the ground of the dollhouse) to fully bury the vertical loop, we instead will cover it with soil by placing the brown felt through the loop as shown.
Voila! Now your farm has hot water and a heated floor! And you’ve also finished the rain harvesting system, so you can use recycled rainwater as needed.
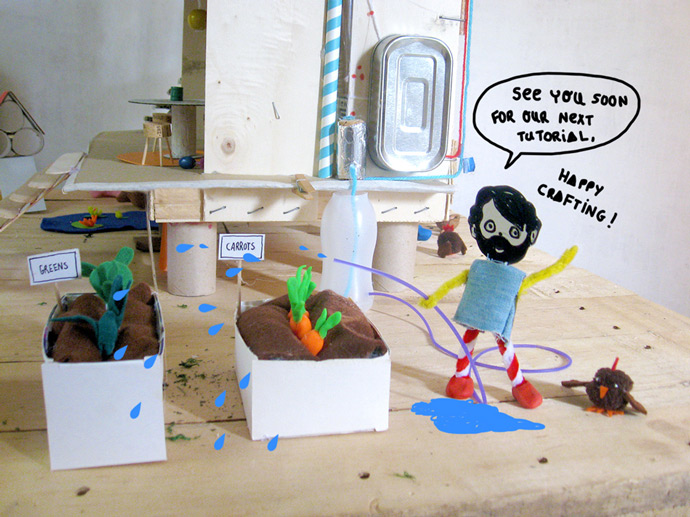
The next tutorial will cover how to make an environmentally-friendly bathroom for our amazing self-sufficient doll farmhouse! Happy crafting!